Tuesday, December 14, 2021

SIMPLE TRICKS TO ORGANIZE YOUR GARAGE


A thoughtful approach to garage storage makes the most of this valuable space and keeps every necessity at your fingertips.

If your house is bursting at the seams, or simply short on storage options, the solution may be as close as your garage. To make the best use of this space, however, you first need to corral its current chaos.

This is, fortunately, a relatively simple task if you incorporate a few good storage ideas. With careful planning and a little effort, you can transform your garage from a messy catchall to an efficient, well-organized household annex.


Divide and conquer

First things first: Get rid of anything you no longer use. After you’ve winnowed down the contents of your garage, sort everything into groups. Keep garden tools with garden tools, and sports equipment with sports equipment. Items used together ought to be stored together.

Where possible, place like items into clear plastic containers with lids. It’s fine to use opaque bins, just be sure to label each one. Stackable containers are especially handy. They keep your belongings clean, protect against insects and rodents, increase the amount of usable floor space, and cut down on visual clutter.


What goes where?

The efficient use of space partly depends on positioning stored items in a thoughtful, strategic way. Are there certain items you’re likely to need on a regular basis, such as cleaning supplies? If so, store them near the door so you can access them quickly and easily. Stash rarely used or seasonal items, like sleds and skis, in harder-to-reach spots.

Off the wall

The key to garage storage and organization is getting things off the floor. Capitalizing on wall space enables you to fit the most into your garage, while keeping it all visible and easy to access. The type of wall storage you choose depends on your storage needs, project budget and personal preferences. Many homeowners opt for one or a combination of the following storage standbys:

  • Pegboard. A favorite for generations, pegboard is inexpensive and easy to install. Because it can be outfitted with an array of compatible hooks, clamps, bins and shelves, pegboard can be used to store and organize just about anything, as long as the item to be stored isn’t especially heavy.
  • Open shelving. Whether a wall-mounted track system or a set of stand-alone units, open shelves are affordable, versatile and user-friendly, and they keep everything in plain sight. Plus, depending on their construction, 12- or 16-inch-deep shelves are typically capable of holding heavier items.
  • Closed cabinetry. If you plan to park your car in the garage, cabinets with doors may be the most desirable option, because closed storage means not having to come face-to-face with paint cans and garbage bags every time you leave or arrive home. Cabinets are available in countless materials and styles, but generally speaking, they are more expensive than other solutions. And because they are unable to accommodate very large items, cabinets are most effective when used in conjunction with another storage system.
  • Panelized systems. Here, entire walls are covered with specially designed panels that hold any number of companion add-ons, such as hooks and shelves. Unlike pegboard, panelized systems can handle heavier items. But that strength and utility comes at a cost, especially since some proprietary products must be installed by licensed professionals.

Look up

For certain infrequently used belongings, the ceiling provides ideal, out-of-the-way storage space. Ladders and seasonal gear can be kept here, hung by clips or straps fastened to the ceiling joists. Or you can take advantage of hoist pulley systems, which cleverly operate like the cords on window blinds. Bear in mind, however, that ceiling storage must be oriented so that it doesn’t interfere with the operation of the garage door.

Safety steps

As you’re organizing your garage, it’s important to keep safety in mind. It’s unsafe to store gasoline and propane in the garage; a single spark could lead to tragedy.

Likewise, if you have children or pets, you should store hazardous materials like fertilizer and pesticides far out of reach. Locked cabinets are a good solution for these toxic materials, and they’re also a smart place to store power tools and sharp implements.

As always, if you have any questions, or have an interest in buying or selling rural real estate, please give The Rural KC Team-Keller Williams Partners, Inc. a call at 913-837-0760 or 913-837-0411.  Have a great day!

Tuesday, December 7, 2021

CREATE THE ILLUSION OF INDOOR SPACE


Having space within the home is important to most homeowners. If everything is too small and cluttered, it can make an otherwise charming home seem claustrophobic and unpleasant. With that said, adding space to your home can be a significant ordeal that comes with a lot of costs; at the very least, adding space means a major remodeling project even if you don’t have to make major modifications like taking out a wall.

It’s often possible to create the illusion of space without actually making modifications to the home, though. The available options will depend on the layout of your house and a few other factors, of course. If you want to make your home seem a lot more open without making major changes or sinking a lot of money into remodeling, here are a few ideas to get you started.

Keep It Light

One easy way to make your rooms seem larger and create an illusion of indoor space is to lighten things up. Dark walls absorb light and make your room seem darker overall, which in turn creates the appearance that the room is smaller than it actually is. If you paint your walls and even the ceiling in lighter shades such as white, yellow, and light browns, then this will lighten up the whole room and make it seem a bit bigger overall.

Adding to this concept, eliminating a lot of the shadows in your room will also make things seem brighter and create your illusion of space. This includes large and dark shadows, obviously, but also smaller shadows such as those cast by popcorn ceilings and small tiles. That doesn’t mean everything has to be flat and covered in light to be effective, of course; large segments, shallow impressions, and similar concepts will allow you to add some contour and shadow to your rooms without ruining this effect.

Low and Open

Another great way to create an illusion of space in your rooms is to keep everything relatively low and unobtrusive in the center of your room. This gives the room a much more open look, letting the space flow freely and making it look like there’s more space than there actually is. This can be accomplished with furniture that lacks high peaks or complex designs that draw the eyes; keep everything attractive but favor minimalist designs over extreme complexity.

Of course, if everything’s at the same level then things are going to get boring pretty quickly. To combat this, put a few decorations on or near the walls so that they can draw the eyes of visitors. Not only does this make a room more appealing, but if someone’s line of sight is drawn to something on the far side of the room then it will help to create that illusion of space that you’re trying to achieve. The brain will register the items of interest as being farther than everything else, making it perceive additional distance even if your decorations or standing lamps are relatively close behind your furniture.

Watch the Clutter

Clutter is the enemy of space. Even large rooms can seem small if you’ve got something scattered everywhere. If you’re trying to maximize the amount of space that a room appears to have, avoid over-decorating and keep clutter on your surfaces and walls to a minimum. This is especially important when it comes to plants and similar items, as it’s easy to overdo it, and those plants are just going to get bigger as time goes by.

As always, if you have any questions or are in the market to either buy or sell rural property, give the Rural KC Team a call.  We would love to help.  913-837-0760 or 913-837-0411.  Have a great day.  

Tuesday, November 30, 2021

PREPARING YOUR HORSE FOR WINTER


 From The American Quarter Horse Journal and AQHA Corporate Partner SmartPak

Because your horse was designed to spend his days roaming outside, he is naturally equipped with tools to keep himself warm when the temperatures start cooling down. However, that might not always be enough in this modern age of horse ownership.

In this article, we examine:

  • How your horse stays warm in cold weather

  • How do you know if my horse is warm enough?

  • Fit Guide for horse blankets

  • Washing turnout rugs and blankets

  • Short-hair secrets for horse showing in winter

How Your Horse Stays Warm in Cold Weather

In response to the fading sunlight, your horse’s body starts producing his winter coat as soon as the days start getting shorter. He begins to grow his longer, thicker winter coat in July, shedding the shorter, thinner summer coat in October. That winter coat has longer and coarser hairs than his summer coat, and he uses them to keep himself warm by fluffing them up to trap heat. The individual hairs stand up rather than lying flat against the skin, which traps warm air close to his body and insulates him from the cold.

Along with using this thick hair coat to stay warm from the outside, your horse also uses calories to keep himself warm from the inside. His body ferments roughage in the hindgut, which creates heat that helps maintain his core temperature, which is why many horse owners feed more hay in the winter.

However, even your horse’s full winter coat and normal calorie intake may not be enough to keep him warm all winter, depending on his body’s lower critical temperature or LCT. Your horse’s lower critical temperature is the lowest temperature at which he can maintain his core body temperature without using additional energy. Once the temperature outside gets below that lower critical temperature, his hair coat and normal calorie intake alone aren’t enough to keep him warm.

The lower critical temperature of an individual horse will depend on the temperatures that he’s accustomed to, the amount of body insulation he has (such as the length of his hair coat and the amount of body fat), and whether he lives inside or outside. That’s why even horses with a full winter coat can sometimes benefit from a blanket!

How do I know if my horse is warm enough?

Sheet or blanket? Stable or turnout? If your horse is going to be outside, you’ll want to put on a turnout, whereas you can choose a stable if he’s only going to be in the barn. Depending on the temperature, you’ll choose a sheet if it’s warmer outside and a blanket if it’s colder, but just like Goldilocks, your horse wants his blanket to be just right. Deciding how much to bundle your horse up can be tough

Just like it does for us humans, 40 degrees will feel different to a Florida horse in October than it will to a horse in Chicago in February, so you’ll need to dress your horse differently depending on the temperatures he’s used to.

In addition, the temperature outside isn’t the only factor to consider when you’re choosing the right blanket for the weather. Other factors, like your horse’s living environment and whether or not he’s clipped should also be taken into account.

SmartBlanketing Tips

You can check out SmartPak’s handy infographic for all things blankets and visit SmartPak’s Ultimate Blanket Destination for everything you need to know about blankets.

Fit Guide for Horse Blankets

  • The blanket should be snug around the neck, with the spine of the blanket ending at the top of the tail.

  • Surcingles should be adjusted so that you can barely get your hand sideways (about 4 inches) between the horse and the surcingle. Adjust leg straps the same way. You want them loose enough so the horse can walk and move comfortably, but not so loose that he could get a hoof caught.

  • Crossing the leg straps at the center (between the horse's back legs) helps reduce the chance of a hoof getting caught. Always snap to the same side of the blanket as the strap originates.

  • To measure for a new blanket, start at the center of his chest, along his side, ending in the middle of his tail. If the measurement you get is an odd number, 77 for example, round it up to the next number.

Washing Turnout Rugs and Blankets

Take your turnout rugs/blankets and stable rugs/blankets to a professional rug/blanket cleaning service that has the specialty equipment needed.

Hand-washing will, however, help to prolong the life of your rug/blanket.

Follow these simple steps:

  1. Remove excess dirt.

  2. Hand-wash at a cool temperature using a non-biological soap (washing in hot water can damage the waterproof nature of the fabric). 

  3. Drip dry. Do not tumble dry. 

  4. Always store in a cool, dry place.

Short-Hair Secrets for Horse Showing in Winter

Long hair works well for horses that are turned out through the winter or undergo low-impact riding. But for horses that train and compete, long hair can make a horse more apt to sweat – then chill. For that matter, short hair is what most trainers and owners desire for their equine athletes during winter. 

AQHA Professional Horsewoman Gigi Bailey of De Pere, Wisconsin, shares her program for keeping horse hair coats short during cold weather.

1. Start With a Warm Barn

An insulated barn keeps horses warmer in the winter and cooler in the summer. Gigi’s show barn was constructed with this in mind. The building’s walls have a 14 R-factor; the ceiling has a 20 R-factor (R-factor refers to the energy efficiency rating of a structure.) She keeps the thermostat at about 64 degrees in the winter, and ceiling fans constantly circulate warm air throughout the barn.

“At 64 degrees in the wintertime in the barn, the horses typically wear a sheet and a heavy blanket, and they wear a light hood or a slinky at night.”

2. Hauling Horses in Blankets

“Feel the day,” Gigi suggests, when discussing whether or not to haul horses with blankets. “Before we take a trip, we stand around and take a poll. ‘Should we haul in heavy blankets and light hoods? Just sheets? Sheets and blankets? Nothing?’ I prefer to put more blankets on the horses and open the windows up a little bit, mostly because I just think the circulation is healthier for the horse.

“When we’re at a show, we check blankets all day long,” Gigi continues. “We feel under the blankets at their withers and on their backs. We want them to be toasty – but not sweating.”

3. Body Clipping

While many trainers and barn managers prefer not to body clip a horse – because the buzzed hair often is duller and a different color than a normal short hair coat – there are times when it becomes necessary.

“If I do have to show one that grows long hair, I usually clip it,” Gigi says. “I think body clips are fine as long as you keep that horse’s hair as healthy as you can before you clip it.”

If she is unable to body clip a long-haired horse for some reason, Gigi makes certain that every other aspect of the horse is in pristine condition before she steps into the show ring. Every day throughout the chilly season, her show horses are curried and vacuumed, followed by a spray coat conditioner. She expects each horse’s grooming to be impeccable – just like a halter horse.

4. Health Check If the Hair Is Still Long

If you’re doing absolutely everything you can think of to keep your horse’s hair coat nice and short, and he still fuzzes up, just know – it happens. Some horses naturally grow more hair. But if the hair coat is dull, or if it is difficult to get the horse to shed throughout the winter, have your veterinarian run some routine health tests.

“When I see a horse’s hair go bad, I try to determine the cause,” Gigi says. “That little alarm will go off in my mind that says I may have a health problem, which routinely is anemia or low thyroid. It doesn’t hurt to pull blood to make sure we’re OK.”

Smart Tools for Smart Riders

Just as handy as the SmartPak blanketing tips are for knowing when to blanket your horse, the SmartPak feeding system – the official supplement feeding system of AQHA – is the ultimate way to feed your horse. SmartPaks™ is a simple, foolproof way to make sure your horse always gets the right supplements. All you have to do is choose the supplements that your horse needs, and we’ll pack them into convenient, customized daily doses that make feeding time fast and easy.

And SmartPaks aren’t just easier for you – they’re better for your horse, too. Because they come in pre-measured doses, are clearly labeled, and sealed for freshness, there’s never any doubt that your horse is getting the absolute best. 

As always, if you have any questions about this blog, please don't hesitate to contact us at 913-837-0760 or 913-837-0411.  Also, if you are interested in buying or selling rural property, give us a call!  Happy Trails.

Monday, November 15, 2021

EVERYTHING YOU NEED TO KNOW ABOUT ROAD SALT


As temperatures start to drop, it becomes more and more evident that the cold of winter is right around the corner. In many areas, this means it’s time to start prepping for low temps and all the ice and snow that often accompany them. There’s one thing that people often forget to prepare for, though: the deluge of road salt that often comes with the winter.

Road salt is obviously used to help keep the roads safe by melting snow and ice before it can become dangerous. Many homeowners use salt and salt alternatives around the house as well, keeping walkways and steps ice-free during harsh weather. If you aren’t careful, though, having too much salt can cause a lot of problems with your landscaping and even some home fixtures. If you want to stay on top of potential salt-related problems, here are some things to keep in mind while preparing for winter.

The Problem With Road Salt

Road salt has been around for a long time; it was first used in the 1930s to help keep ice off of the roads, and though there have been some refinements since then, the basic premise remains the same. Salt lowers the freezing temperature of the water, making it take lower temperatures to freeze and thus preventing some of the ice buildups that can make roads hazardous. Once temperatures drop past a certain point this water can still freeze, but between traffic and the angle of the road surface, there may be less of the slower-freezing water on the road by that point.

Unfortunately, road salt can also cause problems over the course of the winter. Salt sprayed from the tires of passing cars and leached off as runoff from melting snow can get into your yard, damaging or killing grass or plants near the road. That same salt can cause corrosion on your vehicles if you live in an area where the roads are frequently salted, leading to both rust and paint damage as the salty water evaporates and white salt powder builds up on your car. Salt tracked in on your tires and shoes can also cause damage to concrete in your garage and on your steps, especially if it’s left there for extended periods. Even the salt products that you use around the house yourself can lead to some of these problems if you use too much and don’t clean up after.

Road Salt Protection

There are a few ways to protect your home and lawn from the effects of salt during the winter. If you use a lot of plants or decorative grasses in your yard, keep sensitive plants away from roads and driveways and plant hardier grasses in the areas that will get the most salt exposure. When temperatures rise above freezing, water the areas where salt was splashed onto your yard thoroughly to help dilute the salt and add lime or gypsum as well to help neutralize the salt’s effects. You should also keep an eye on grass and plants that seem to develop salt damage so that they can be replaced in the spring.

To protect your garage floor and other parts of your home, be sure to rinse them thoroughly with clean water to remove possible salt buildup. To add a layer of protection to the concrete, consider applying an epoxy-based sealant to the garage floor as well before temperatures drop too much. Wash your car when possible if you notice salt buildup to remove it before it can cause damage. If you’re using sidewalk salt to keep your steps clear, choose a concrete-safe salt alternative or ice melt mix to help prevent damage.

If you are in the market to either buy or sell rural property, please feel free to contact The Rural KC Team-Keller Williams Partners, Inc. at 913-837-0760 or 913-837-0411 or go to ruralkc.com.  


Wednesday, November 10, 2021

FARM ANIMALS ARE BENEFICIAL TO YOU AND YOUR FAMILY'S HEALTH

People are drawn to country life, homesteading and hobby farming for different reasons. 

Some relish the peace and quiet of being surrounded by acreage, others draw pleasure and purpose from gardening and working the land or achieving greater self-sufficiency.

But for many of us, the desire to go-rural is driven by our love of animals.

If you’ve been looking for a good excuse to upgrade from house pets to farm animals, check out these 5 ways keeping farm animals can help keep your entire family healthier and happier. 

#1: Farm animals reduce the risk of asthma and allergies in children and babies

While it may seem counter-intuitive, researchers at Johns’ Hopkins University discovered that babies exposed to dirt, animal dander (yes!) and germs had a lower risk of allergies and asthma later in life than children raised in cities or towns.

Other studies conducted on Amish children have shown the same results: the more time kids spend with farm animals, the significantly lower their risk of asthma and allergies.

Our next point explains why this phenomenon occurs...

#2: Keeping farm animals can significantly boost your immunity

Not only does being around farm animals help lower a child’s risk of asthma and allergies, but studies have proven farm kids tend to have stronger immune systems, more resilient gut microbiomes and less chronic childhood disease than city kids.

Many of these health benefits are due to the microbe-rich barnyard dust that children inhale, which (believe it or not) challenges and strengthens their immunity over time.

Additionally, spending time outdoors tending to animals exposes us to natural sunlight which helps boost vitamin D levels. Plus, farm chores promote regular exercise and movement—all of which strengthen immunity.

#3: Farm animals provide healthier food & superior nutrition

grassfed beef

There’s a certain level of satisfaction that comes from growing and raising your own food; and research has confirmed that raising your own animals for meat, milk and eggs has some impressive health benefits.

For example, a study from Penn State showed that chickens raised in their natural environment, with plenty of access to the outdoors, green grass, worms, grubs, etc. produced eggs with double the amount of vitamin E and omega 3 fatty acids, a more favorable ratio of omega 3 to omega 6 fatty acids (which helps your body fight inflammation) and a higher concentration of vitamin A.

Dairy cows raised on pastures give milk which is higher in essential fatty acids like anti-inflammatory omega 3 and CLA (conjugated linoleic acid). And many dairy farmers and health enthusiasts swear raw milk, aka: “farm milk” is easier to digest, tastier and less allergenic than pasteurized homogenized milk.

And beef cattle raised on grass produce a leaner healthier meat higher in omega 3s, CLA, precursors to vitamins A and E (such as carotenoids which give the fat a yellow hue) and the antioxidants glutathione and superoxide dismutase; all while being lower in fat and cholesterol than grain-fed cattle. 

Plus, if you’re raising your own animals you have total control over what goes into their bodies— which typically results in less antibiotics and artificial hormones...and that’s good for everyone.

#4: Caring for farm animals protects your mental and emotional health too

You’ve probably read about the health and longevity benefits of house pets, but science shows that farm animals can impact your mental and emotional well-being too.

Horses, for example, have long been used as therapy animals for children and adults with disabilities; and horseback riding through equine programs has been shown to help quell stress and anxiety in teens by reducing cortisol levels.

Beyond equine therapy, Care Farms have shown promising benefits for those with mental, emotional, memory and behavioral health issues

A Care Farm is a special non-institutional setting where people can interact with and care for farm animals as part of their healthcare treatment program. On a Care Farm, useful work while interacting with animals forms the basis of the therapy.

The animals on these Care Farms have shown great promise in providing participants with a variety of mental and emotional benefits including: 

  • Meaningful daily occupation
  • A way to connect and create valued relationships
  • Better coping skills
  • Opportunities for reciprocity
  • A distraction from their problems
  • A source of relaxation
  • Enhanced feelings of acceptance and purpose
  • Healthy relationships with other people on the farm
  • Stimulating healthy behavior
  • Opportunities for reflection and feedback

Additionally, farmers on Care Farms have noted the animals provide a “mirror” for the participants, which helps them see how their own behavior and attitudes directly affect others.

Research has also shown Care Farms provide structure, purpose and stimulus which benefit those with dementia.

Care Farms

#5: Farm animals and pets help protect your heart health

Strange, but true. 

Research from the American Heart Association has shown regular interaction with animals benefits your heart health by:

  • Lowering blood pressure and cholesterol
  • Reducing stress
  • Improving physical fitness 
  • Reducing the risk of obesity

Plus, animals provide companionship and purpose—both of which are important in protecting your heart health and longevity.

If you are interested in moving to the country, please feel free to contact the Rural KC Team-Keller Williams Partners, Inc. at 913-837-0760 or 913-837-0411,


Thank you to Kristen Boye with ReThink Rural for this blog post.


Tuesday, November 2, 2021

PAINTING CONCRETE FLOORS


When most people think of flooring, they picture things like carpet, wood flooring, tiles, and other common floor coverings. There are other options available to homeowners though, including concrete floors. While concrete was once seen mostly in places like basements and garages, it’s becoming increasingly common on the main floor of homes as well. Concrete flooring with built-in radiant heating systems is becoming a lot more popular, especially in areas that tend to have more severe winters.

Some people think that concrete flooring is limited in its decorative options, assuming that the only thing you can do with concrete is to apply a sealant or stain. There are other options available, though, including painting the concrete. But be careful before just slapping a coat of paint onto a concrete floor; there are a few things that you should know first.

Prepping the Surface

One of the biggest problems that people have with concrete floors is trying to paint them without having adequately prepped the concrete surface first. In order for paint to adhere to concrete well, the surface needs to be rough enough for the paint to get a good hold, and it also needs to be clean and dry. This can mean a little more prep time than some other types of flooring, but the end results are definitely worth it.

Seal any cracks in the concrete with concrete filler, then sweep the concrete to remove any dust or lose debris. Scrape off any old paint or other materials that are stuck to the floor. Wet the floor with a sprayer or mop, then apply a concrete degreaser and scrub the surface with a stiff-bristled broom to clean it. Rinse well and clean up any excess water with a wet/dry vac so that the surface can dry completely before you start painting.

Painting and Sealing

Once your floor is completely dry, it’s very important to put down at least one or two coats of primer that’s designed for use with concrete before you actually start painting. Tape off all of the baseboards and other areas that you want to protect, then start applying your primer at the edges and work toward the middle. Try to get each coat applied in a single painting session, as you don’t want to let the primer dry in patches that will show through in the final paint application. Allow each coat a chance to dry completely before starting on the next, waiting up to 24 hours if necessary to ensure that it’s fully dry.

Once you’ve applied your primer, it’s time to start painting. Use a concrete-friendly epoxy paint and follow the same application instructions that you used with the primer. Get good coverage along all of the edges before moving in toward the center and allow each coat a chance to dry completely. Once your paint is completely dry, apply a concrete sealer and follow the manufacturer’s directions to ensure that it cures properly. Ventilation and proper masking are especially important for this step, as come sealers can release fumes that you don’t want to breathe.

Understanding the Project Scope

Painting concrete floors can be intimidating because the process is a bit more involved than your standard paint job. If care isn’t taken to ensure that the floor is properly cleaned beforehand and sealed afterward then you can end up with bubbles and peeling paint down the road. Getting all of your materials together before the job starts and following all material instructions will save you a lot of trouble in the long run, since you won’t have to stop to go get something or run into issues with improperly applied coats.

If you have any questions or comments, please feel free to contact the Rural KC Team at 913-837-0760 or 913-837-0411.  Have a great day!

Tuesday, October 26, 2021

CLEANING YOUR TOUGHEST PATIO AND DECK STAINS


After a long summer, it’s time to clean up around your home and get everything in good shape before the winter comes. Not only does this sort of fall cleaning help your home look nice after the rain and heat of summer, but it can also aid you in finding issues or damage that you might want to take care of as you winterize your home. Some areas that often need particular attention during these cleanup periods are patios and decks.

Part of the reason for this is that many people use their patios and decks more during the summer than at any other time of the year. Various spills, dripping grease and oils from grilling, and assorted other messes can end up on the wood, while changes in weather over the course of the summer can encourage the growth of things like algae and mildew. Knowing how to effectively clean up all of these stains and other issues will not only make your deck or patio look better, but can also result in them lasting significantly longer without needing repairs.

Deck Stain Removal

Effectively cleaning up the various stains that occur on your deck or patio becomes a lot easier if you know the source of the stain. Grease stains, sauces, and similar spills can usually be cleaned with dish soap and a stiff-bristled brush, followed by washing the area thoroughly before it has a chance to start drying again. Dish soap can also be used to remove stains from decomposing leaves; allow it to sit and penetrate for 10 or 15 minutes before scrubbing and rinsing the stains away.

Other types of staining may require different solutions, however. Rust stains may need to soak in a mix of water and white vinegar or specialized acid cleaners to remove the discoloration. Tree sap can also be stubborn and difficult to remove, often needing dedicated deck or patio cleaners or cleaning solutions such as liquid oil soap cleaners. Some stone patios may require specific cleaners that won’t damage the type of brick or stone that’s used as well.

Dealing with Algae, Moss, and Mildew

Discolorations caused by algae, moss, mildew, and mold are usually a bigger problem than other stains, even though the other stains may be more common. The problem with algae, mold and similar growths is that they actually cause damage to the wood or stone of your patio or deck and need to be dealt with as soon as possible. Some growths like moss can be removed with soap, water, and a stiff-bristled brush, but things like algae and mold typically require a bit more. Because these grow into the wood or stone and thrive in moist environments, you’ll need a cleaner that can actually kill them and prevent them from coming back. In some cases, a bleach/water mixture will do the trick, combined with some scrubbing and general cleaning afterward. Special deck and patio washes are also available that are formulated to kill mildew, mold, algae, and similar growths, helping to ensure that you take care of the problem without having to try out different DIY mixtures.

Professional Cleaning

If you haven’t had much luck getting your deck or patio clean or simply don’t have the time to dedicate to the cleanup, there are professional services available that can get the job done for you. They typically use cleaners that are designed for the types of cleanup you need and may employ tools such as a power wash sprayer to really get into all of the places that are hard to reach with a brush or a broom. Depending on the service, they may apply new sealants or other protectants after your deck or patio is clean as well to help you weather the winter unscathed. 

As always, if you have any questions, or would like to buy or sell rural property, The Rural KC Team-Keller Williams Partners, Inc., is the one to call.  913-837-0760 or 913-837-0411.


Wednesday, October 20, 2021

WHAT SHOULD YOU DO WITH YOUR REMODELED FIXER-UPPER?


What Should You Do With Your Remodeled Fixer-Upper?

Buying a fixer-upper to renovate is an appealing investment opportunity for some, but once the property is repaired, should you rent it out or sell it? In some areas, renting can be a reliable long-term revenue stream, while in others, it makes more sense to sell. If you’re not sure what the best move is, use this advice from the Rural KC Real Estate Team to help you decide.

Tips for Making a Property More Desirable

The trick to making money flipping homes is to find a property that's undervalued, then make small improvements to get a better price for it. Some of the simplest improvements are ones that increase a property's curb appeal.

For example, a property with a garden might look a lot better with a fresh lawn and a new fence. If you're not skilled at this kind of work yourself, you should hire a fencing contractor. Don't just hire the first contractor you find, though—read Angi fencing reviews online and get multiple quotes. The average cost of a new fence is around $4,500, but actual prices vary depending on the materials, the size of the fence, and your area. Choose a contractor who's licensed and insured, and make sure they check the area for any underground utilities before starting work.

Why Flipping Is Often More Convenient Than Renting

Flipping a property can offer a one-off profit. Many flippers follow the 70% rule. This rule dictates that the cost of a property and any repairs done to it should be no more than 70% of the value of the property after the repairs are completed.

Finding properties that are this undervalued can be difficult, but foreclosure auctions do still offer such opportunities. People who are experienced DIY enthusiasts and can make basic repairs themselves can often turn flipping into a revenue-generating side business this way.

A 30% return on investment can be appealing, but it's a one-off source of income, and once the repairs are completed, the flipper will need to find another property and do the work again to get the next payout. Unless you have enough funding to have more than one property on the go at a time, flipping can be stressful and the income stream may not be stable—especially compared to the monthly income of rental properties. There's a reason there are nearly 50 million properties being rented in the U.S.

The Responsibilities of Being a Landlord

Renting out properties can generate a steady income and could offer tax deductions, too. However, for landlords to benefit from tax deductions and property value appreciation, they have to do a lot more day-to-day work.

Many landlords find themselves having to pay property managers to handle the daily operations of their portfolios, as well as landscapers and other maintenance contractors to look after the properties. This can quickly eat into profits. Non-paying tenants can also be an issue because the process of evicting them can be long and slow in some states. Being a landlord is not easy money.

Have a Business Plan Before You Start

Property renovations should be approached like any other business. Whether you decide to rent out the renovated property or sell, it's a business decision. Run the numbers, talk to some professionals, and understand the market in your area before you start spending money.

Are you in search of an investment property or your forever home in the Kansas City area? Contact the Rural KC Real Estate team!

Wednesday, October 13, 2021

ARE YOU ON THE FENCE: RENOVATE OR MOVE????

The last 18 months changed what many buyers are looking for in a home. Recently, the American Institute of Architects released their AIA Home Design Trends Survey results for Q3 2021. The survey reveals the following:

  • 70% of respondents want more outdoor living space
  • 69% of respondents want a home office (48% wanted multiple offices)
  • 46% of respondents want a multi-function room/flexible space
  • 42% of respondents want an au pair/in-law suite
  • 39% of respondents want an exercise room/yoga space

If you’re a homeowner who wants to add any of the above, you have two options: renovate your current house or buy a home that already has the spaces you desire. The decision you make could be determined by factors like:

  1. A possible desire to relocate
  2. The difference in the cost of a renovation versus a purchase
  3. Finding an existing home or designing a new home that has exactly what you want (versus trying to restructure the layout of your current house)

In either case, you’ll need access to capital: the funds for the renovation or the down payment your next home would require. The great news is that the money you need probably already exists in your current home in the form of equity. 

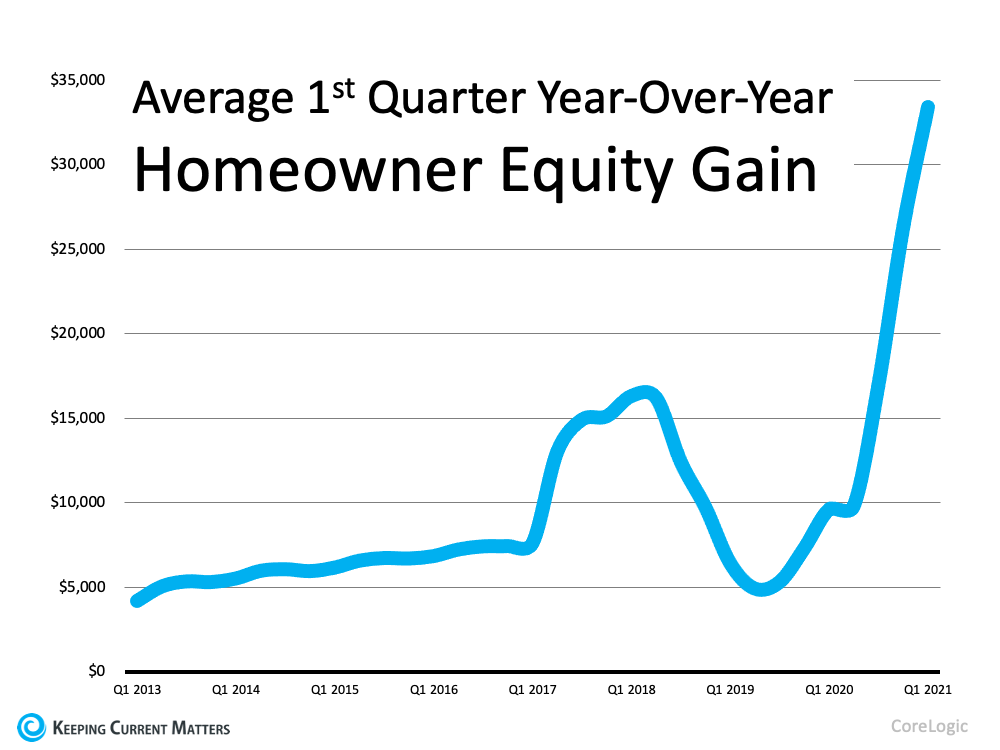
Home Equity Is Skyrocketing

The record-setting increases in home prices over the last two years dramatically improved homeowners’ equity.  The graph below uses data from CoreLogic to show the average home equity gain in the first quarter of the last nine years:The Big Question: Should You Renovate or Move? | Keeping Current MattersOdeta Kushi, Deputy Chief Economist at First American, quantifies the number of equity homeowners gained recently:

“Remember U.S. households own nearly $35 trillion in owner-occupied real estate, just over $11 trillion in debt, and the remaining ~$24 trillion in equity. In inflation adjusted terms, homeowners in Q2 had an average of $280,000 in equity- a historic high.”

As a homeowner, the money you need to purchase the perfect home or renovate your current house may be right at your fingertips.  However, waiting to make your decision may increase the cost of tapping that equity. 

If you decide to renovate, you’ll need to refinance (or take out an equity loan) to access the equity. If you decide to move instead and use your equity as a down payment, you’ll still need to mortgage the remaining difference between the down payment and the cost of your next home.

Mortgage rates are forecast to increase over the next year. Waiting to leverage your equity will probably mean you’ll pay more to do so. According to the latest data from the Federal Housing Finance Agency  (FHFA), almost 57% of current mortgage holders have a mortgage rate of 4% or below. If you’re one of those homeowners, you can keep your mortgage rate under 4% by doing it now. If you’re one of the 43% of homeowners with a mortgage rate over 4%, you may be able to do a cash-out refinance or buy a more expensive home without significantly increasing your monthly payment.

First Step: Determine the Amount of Equity in Your Home

If you’re ready to either redesign your current house or find an existing or newly constructed home that has everything you want, the first thing you need to do is determine how much equity you have in your current home. To do that, you’ll need two things:

  1. The current mortgage balance on your home
  2. The current value of your home

You can probably find the mortgage balance on your monthly mortgage statement. To find the current market value of your house, you can pay several hundreds of dollars for an appraisal, or you can contact a local real estate professional who will be able to present to you, at no charge, a professional equity assessment report.

Bottom Line

If the past 18 months have refocused your thoughts on what you want from your house, now may be the time to either renovate or make a move to the perfect home.  If you are interested in making a move, please feel free to contact the Rural KC Team-Keller Williams Partners, Inc.  We can help you make a no-hassle move.  913-837-0760 or 913-837-0411.