Moving to a Small Town
Trading city skylines for open fields may sound idyllic, but the reality of moving to a rural
small town involves more than a change of scenery. Whether you're looking for slower
living, lower costs, or closer-knit communities, adjusting to life in a small town requires
preparation, patience, and a sense of curiosity. From learning how to navigate new social
dynamics to understanding the resources—or lack thereof—available to you, this move is
about more than packing boxes. It’s about embracing a new rhythm of life while staying
connected to the things that matter most.
Understand the Lifestyle Shift
Before you commit to a rural relocation, take a moment to reflect on the kind of lifestyle
you’re about to enter. Small towns often operate at a much slower pace, and conveniences
you took for granted—like 24-hour grocery stores, same-day delivery, or five Uber drivers
on standby—might not exist. Expect longer drives for certain goods and services and fewer
options overall. But in exchange, you’ll find less traffic, more tranquility, and a deep sense
of community that’s hard to replicate in a city. This change can be refreshing, but only if
you're willing to adapt.
Earn a Degree from Anywhere
If your new town lacks a local college or university, earning an online degree can help you
continue growing your career while settling into rural life. For instance, by earning an IT
degree, you can build career-relevant skills in information technology, cybersecurity, and
more—without ever needing to commute to campus. Online degree programs make it easy
to work full-time and keep up with your studies, offering both flexibility and structure. This
is a good option to consider if you’re aiming to future-proof your career in a location with
fewer local education opportunities.
Entertainment is What You Make It
You won’t find a comedy club, a string of museums, or rooftop lounges in most rural
towns—but you will find charm in the simpler things. Small-town entertainment often
revolves around local sports, community events, outdoor activities, and seasonal festivals.
Hiking trails, fishing spots, and stargazing nights might replace your usual nights out, and
that can be a good thing. The slower pace gives you room to rediscover old hobbies or start
new ones, and you'll likely find that bonding over local traditions becomes its own kind of
fun.
Job Hunting in a Smaller Market
Finding work in a small town may require a more flexible mindset. Local job markets can
be limited, with fewer corporate roles and more reliance on small businesses or
agricultural industries. You may need to pivot—either by embracing remote work, taking
on a role outside your usual field, or even launching a small business yourself. Make use of
local job boards, community bulletin boards, and word-of-mouth. In tight-knit areas,
knowing someone who knows someone can be just as valuable as your résumé.
Do Your Homework on Schools
If you’re moving with kids, school quality will be top of mind—and it varies widely in rural
areas. Some small-town schools offer small class sizes and close teacher-student
relationships, while others may struggle with funding or resources. Visit schools in advance
if possible, talk to parents in the area, and look at public data on school performance.
Homeschooling and online options are also growing in popularity for families looking for
flexibility. The key is to know what your child needs and whether the local options align
with those needs.
Helpful Services to Have in Place
When you’re new to town, setting up basic services efficiently is key to avoiding surprises.
Research your options for internet (which may be slower or more limited), waste removal,
utilities, and medical care. Knowing where the nearest hospital, urgent care center, and
pharmacy are can be especially important. You’ll also want to locate the closest mechanic,
post office, and pet care provider early on. Being proactive about these practical matters
makes your transition smoother and less stressful.
Give Yourself Time to Adjust
Even if you’re moving for all the right reasons, the adjustment period can bring unexpected
challenges. Isolation, homesickness, or moments of frustration are all normal, especially if
you're leaving behind a vibrant social life and fast-paced routine. But don't rush the
process—like any transition, this one takes time, and the rewards reveal themselves
slowly. Keep your routines where possible, stay connected to old friends virtually, and
make space for new relationships to bloom. Over time, what feels unfamiliar can become
comfortingly yours.
Relocating from a busy city to a rural small town is more than a move—it’s a lifestyle
transformation. It offers a chance to slow down, focus on what matters, and grow roots in a
community that values connection over convenience. While you’ll need to adjust to changes
in entertainment, transportation, and job markets, you’ll also discover a wealth of
opportunity in the simplicity and sincerity of rural life. And if you ever want to deepen your
skills or improve your career options, going back to school—especially through online
programs—is a powerful step forward.
Discover the charm of rural living and explore opportunities to make your dream home
a reality with the Rural KC Team-Keller Williams Partners today!

 So, even if your score isn’t as high as you want, that doesn’t automatically close the door. FICO explains there is no universal credit score you absolutely have to have when buying a home:
.png)

.png)


.png)


.png)

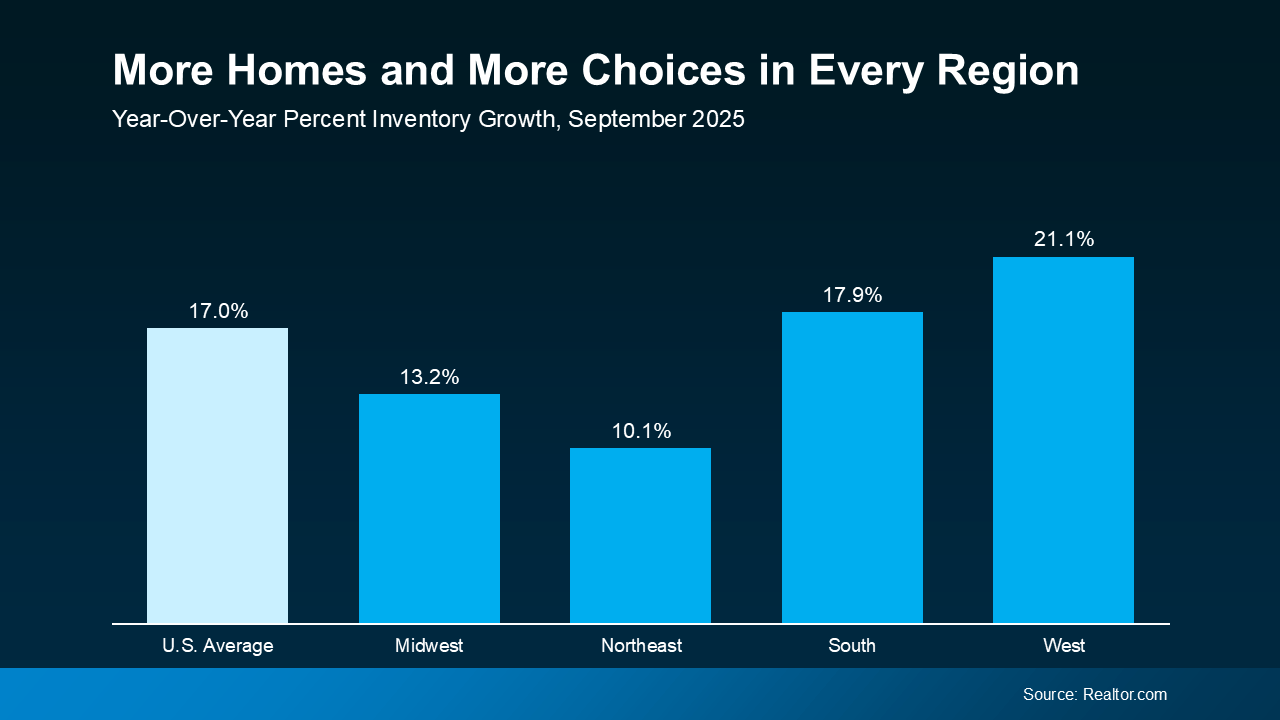
 Just remember, what’s worth updating really depends on the homes you’re competing with in your market. Some areas don’t have a ton of inventory, so little updates may be all you need to tackle. In other areas, there are far more homes for sale, so you may need to do a bit more to make your house stand out.
.png)


.png)
.png)


.png)

 Even when the stock market falls more substantially, home prices don’t always come down with it.
.png)


.png)
.png)
.png)